
for Journal with
Quilted And Felted Cover


Recently, I was asked if I have a pattern for my felted books. I decided to do a small simplified version, take pictures, and give some dimensions. I am going to show pictures and give some links to other sites because I don’t have time right now to draw and scan diagrams!
I am not going to use a lot of book binding terms because I don’t want to spend hours defining them! So I will try to keep it very simple.
It is always easier to try a new technique on a small scale and with easily accessible materials.

For the cover you need:
4 1/2 x 12 inch piece of polyester or wool felt (1 sheet cut in half length-wise)
Or 11.5 x 30.5 centimeters
small scraps of quilter's cotton fabric
yarn wool roving or dyed locks of wool (for use with needle felting tool)
Here are pictures of my example: pieced, felted, and quilted. See previous post for tutorial on how I use needle felting on a quilt.

When I was pleased with the look of my cover I trimmed it down to 4 inches wide, rounded the corners slightly, and finished the edges with zigzag stitch.
(If you don't want to do the needle felting this could be made without felting as a small slender quilt using batting with cotton fabric on top and bottom and lots of machine stitching to hold the layers together.)
I used 6 sheets Canson Mi-Teintes colored drawing paper from a 9x12 inch pad.
You could buy one large sheet and cut it or use what you have, even nice copier paper
(8 ½ x 11 inches) parchment or other paper with pleasant weight and color.
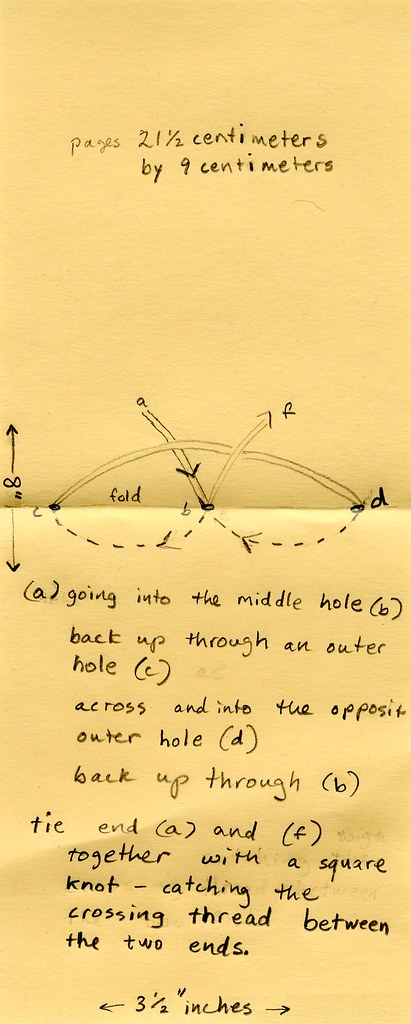
Cut paper 3 ½ x 8 inches long or 9 x 21.5 centimeters.
To make your book pages cut the paper to size, fold in half and burnish the fold for each page individually then nest sheets together to form a signature. Use 6 - 12 sheets nested together, depending upon the heaviness of the paper. With the Canson paper I used 6 pieces of paper (folios) per signatures (groups of pages that are nested together).
Make a pattern for the holes in the pages. Cut an extra page of cheap paper the size of your pages. Make a mark in the fold, at ½ inch, 1 ¾ inch, and 3 inches. That will put stitches ½ inch from the top and bottom and in the center. I used an awl to punch the sewing holes in each page. For years I used a sharp nail. The hole should be about the size of the thread and needle.
Sewing the pages into the cover
I used waxed linen thread and a sharp needle with a large eye appropriate for the thread. You could also use six strand cotton or linen embroidery thread or pearl cotton.

The pamphlet stitch is good for sewing each signature into the cover and is very easy and elegant! You can begin the stitch inside the book, like I did here, or outside on the spine for a different look. If you choose to make a really large book someday, you may need to reinforce the spine area and use a different stitch.
I made an effort to sew the signatures in straight. Sewing all the way through the cover, with the spine of the pages at a right angle to the cover’s edges.  I put about 1/8 inches between signatures when I sewed them into the cover. If you expect to glue a lot of elements into your book you can leave more space at this time.
I deckled the fore edge of the pages.
14 comments:
Your felted books are really beautiful. I love the colors.
I got in a time crunch so my appologies for only giving measurements in inches! I intend to come back and give centimeter measurements also.
I really like your felted books. Thank you for this tutorial. I've been looking for ideas for raffle prizes for the WI, and one of these would be perfect!
Thank you for the tutorial, Molly! Your books are lovely!
Thank you so much Molly! I feel so inspired everytime I read you blog. And I want to try everything out at once.... I wish I had more time!
Very beautiful and unusual! Love the technique. Thanks!
very wonderful and thank you for the tutorial
Thank you for the tutorial, I think I will try it. Your book is so crazy, I love it.
Molly I can't believe this is a book. How beautiful it would be to work in something so tactile!
Cynthia
[OT: Thanks for commenting in my blog. I AM coming to your area of Texas so email me if you are interested: botanicalart@ev1.net
Oh the link to your photo you lefton my blog goes nowhere please try again. Delete this parenthesis segment. I did not know how else to reach you. lol Cynthia].
This is wonderful. I just hope I can do it! I'm so textile impaired.
Brownies and lemonade await you at Yahweh's Retrreat..... :-)
Vanessa
This book is truely amazing!!!
thank you for your kind comments!
oh, I love tutorials! this one is a marvellous one! I like so much your use of the fabric with the web/flower(?). thank you so much for it!
wow!
your journal cover is gorgeous!!
I have always kept an art journal but recently I've been trying to bind my own (no success with it yet! :s)
I googled something else entirely and came across this post.
thank you for sharing this. its realy beautiful and inspiring.
going to see newer posts on your blog now.
Post a Comment