Book Binding Tutorialfor Journal with
Quilted And Felted Cover

Recently, I was asked if I have a pattern for my felted books. I decided to do a small simplified version, take pictures, and give some dimensions. I am going to show pictures and give some links to other sites because I don’t have time right now to draw and scan diagrams!
I am not going to use a lot of book binding terms because I don’t want to spend hours defining them! So I will try to keep it very simple.
It is always easier to try a new technique on a small scale and with easily accessible materials.
Make the quilted cover:
For the cover you need:
4 1/2 x 12 inch piece of polyester or wool felt (1 sheet cut in half length-wise)
Or 11.5 x 30.5 centimeters
small scraps of quilter's cotton fabric
yarn wool roving or dyed locks of wool (for use with needle felting tool)
Here are pictures of my example: pieced, felted, and quilted. See previous post for tutorial on how I use needle felting on a quilt.

When I was pleased with the look of my cover I trimmed it down to 4 inches wide, rounded the corners slightly, and finished the edges with zigzag stitch.
(If you don't want to do the needle felting this could be made without felting as a small slender quilt using batting with cotton fabric on top and bottom and lots of machine stitching to hold the layers together.)
Paper for pages:
I used 6 sheets Canson Mi-Teintes colored drawing paper from a 9x12 inch pad.
You could buy one large sheet and cut it or use what you have, even nice copier paper
(8 ½ x 11 inches) parchment or other paper with pleasant weight and color.
Cut paper 3 ½ x 8 inches long or 9 x 21.5 centimeters.
To make your book pages cut the paper to size, fold in half and burnish the fold for each page individually then nest sheets together to form a signature. Use 6 - 12 sheets nested together, depending upon the heaviness of the paper. With the Canson paper I used 6 pieces of paper (folios) per signatures (groups of pages that are nested together).
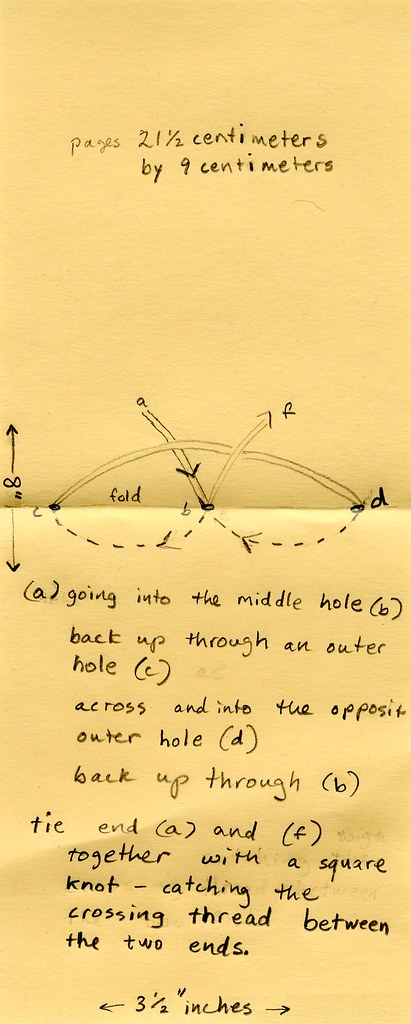
Make a pattern for the holes in the pages. Cut an extra page of cheap paper the size of your pages. Make a mark in the fold, at ½ inch, 1 ¾ inch, and 3 inches. That will put stitches ½ inch from the top and bottom and in the center. I used an awl to punch the sewing holes in each page. For years I used a sharp nail. The hole should be about the size of the thread and needle.
Sewing the pages into the cover
I used waxed linen thread and a sharp needle with a large eye appropriate for the thread. You could also use six strand cotton or linen embroidery thread or pearl cotton.

The pamphlet stitch is good for sewing each signature into the cover and is very easy and elegant! You can begin the stitch inside the book, like I did here, or outside on the spine for a different look. If you choose to make a really large book someday, you may need to reinforce the spine area and use a different stitch.
I made an effort to sew the signatures in straight. Sewing all the way through the cover, with the spine of the pages at a right angle to the cover’s edges.  I put about 1/8 inches between signatures when I sewed them into the cover. If you expect to glue a lot of elements into your book you can leave more space at this time.
Odds and Ends
I crocheted a chain with two coordinating yarns for the wrap around tie.
I deckled the fore edge of the pages.
Feel free to ask questions in the comments. I may amend this as I see the need or leave comments.


 My new Etsy store is launched with one item!